My favourite format of our popular foraging workshops go under the title of ‘Forage & Feast’. This alliterative name is slightly throwaway in the foraging world and sessions under that nomenclature can take a number of different formats. For Forage Box, I wanted it to be the most exhaustive, comprehensive and in-depth experience we offer, so I made them the best place for our tutors to showcase the most amount of wild food they could.
For my own Forage & Feast events, I present guests with a lunchbox that breaks into four different parts, with drinks served on the side. The four tubs contain what I call “heft” (to fill everyone up), hot food, dessert and then the preserved box. This is the part of lunch that really leaves an impression on my guests – yes, they can expect a huge array of wild ingredients in this part of the show, but they also get to see the power of preservation and how some of these processes can unlock flavour you might not ever have experienced. Now, if you use the word ‘preserve’ in certain circles, they might think of jam. Widen the circle and they might just about think of chutney. Wider still and an infusion or two might pop into the conversation. Of course, the reality is that there are an incredible number of ways to preserve food. This could include using an agent (such as sugar, spirits or vinegar), fermentation using salt, fermentation using yeast and even just simply drying. These can all be a bit overwhelming if you tend to take your advice from those looking for hits, clicks and a rising view count online, so I am going to use this as a chance to break down some of these processes in simpler, more practical terms that should be able to feature in your every day use of a home kitchen space.
Autumn is often seen as the season of abundance, yet so many people end up swamped by their veg plot gluts or with no idea how to save that precious wild ingredient they have taken the time to forage. Let’s take it as read that your freezer is too full and you are looking to store your wild bounty in a way that is probably much better for your palate, your energy bills and the environment.
Detailed below are what I consider to be the five most important ways to preserve your harvest, how to do them at home and which wild ingredients are worth giving a go in each case.
Drying (dehydrating)
Nice and obvious to start with – moisture is an important factor for mould and other bacterial growth, so the drying process simply removes any moisture from your ingredients allowing you to then store them indefinitely without the need for further preservation. It might sound like a faff, but you can simply slice your ingredients up (the greater the surface area, the better) and then put them in your home oven set at 50C with the door open. It might not be as cost-effective as an actual dehydrator, but it does the job perfectly well. Some air fryers have a dehydrator setting too!
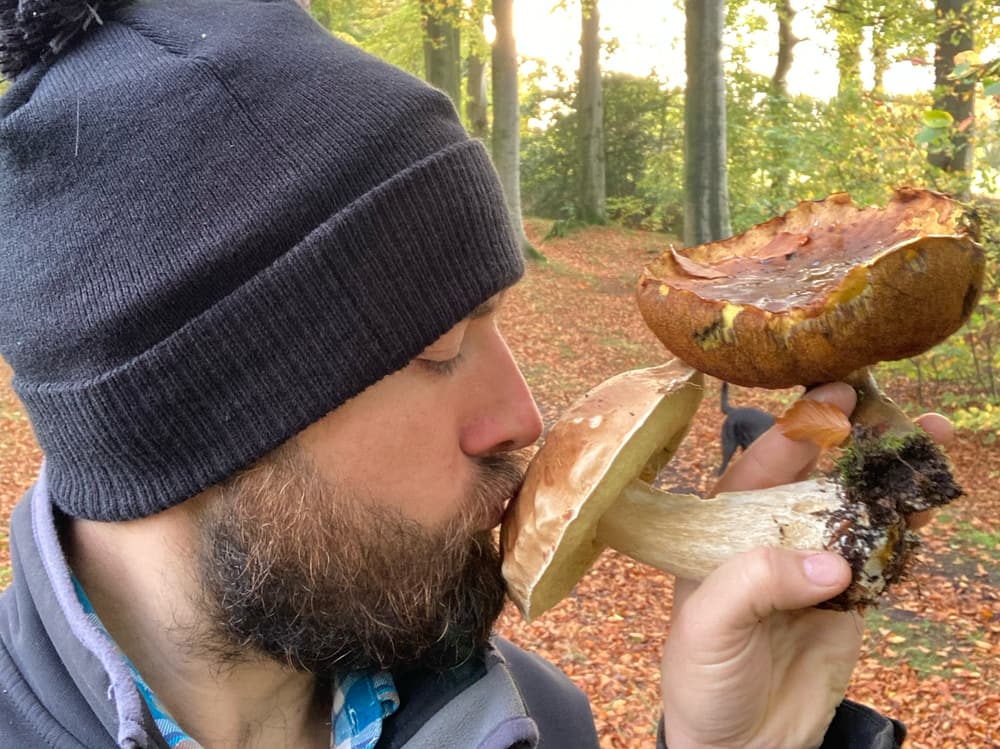
Works especially well with wild mushrooms and seaweeds, whose flavours are actually enhanced during the drying process.
Syrup
Who doesn’t love syrup? It might be the most universally loved substance, due to essentially being sugar. There are various tips on how to make syrups – I’m quite partial to making a cheong, a process involving no heat at all but this can have varying results for the beginner – but the principle is the same: boil ingredient, strain ingredient, match weight/volume with sugar, boil again to 102C, bottle. It’s a tried and tested method in my house and maintains the fun in the cooking process, without the need for overly-precise measurements. Want it to last longer? Add more sugar. Want it to be less sweet? Add less sugar, but expect a shorter shelf life. As with all fermentation, make sure your bottles or jars are sterilised before filling. Fruit is the obvious choice for making syrups, so try hedgerow berries such as sloes, hawthorn or guelder rose. These three examples are either poisonous, flavourless or bitter when raw but the simple act of turning them into syrups unlocks some pretty incredible flavour profiles.
Fermentation using yeast
This might sound boozy, and it certainly can be, but it this also includes sodas and other naturally-fermented drinks. The science is easy enough: yeast consumes sugar to create alcohol and carbon dioxide. You can harness this process to enhance or simplify your wild brew. In the past, I have made cider simply from juicing apples and then bottling the resultant liquid – the naturally occurring yeast consumes the naturally occurring sugars and your bottle of apple juice eventually turns into a sparkling cider (remember to burp your bottles!). Push the form a tad by tweaking the syrup-making process detailed above: boil, strain, add sugar, cool (important!), add yeast and allow it to ferment in a demijohn or similar vessel. Once you’ve got the bug for this, you will grow to be comfortable with secondary fermentation, siphoning, pectolase, using a hydrometer and other key techniques in the homebrew arena.
I love making homebrew wine and it is one of the key methods that got me hooked on self-sufficient living – what could be better than free wine, after all? – but it now allows me to take excessive gluts of fruit like damsons, crabapples or elderberries and save them for a party in the future.
Fermentation through salt (AKA Lacto-fermentation)
A friend of mine once said that both foraging and fermentation are skills. However, when you combine the two you’ve got yourself a superpower. Lacto-fermentation might sound like it has something to do with milk, but it is actually done by simply adding the right amount of salt. Kimchi, sauerkraut, proper gherkins and sour beers all use this ancient process to unlock the deeper and more complex flavours found in their constituent parts. Again, the science is simple: salt inhibits the growth of all bacteria barring the important one in this instance, known as lactobacillus, which then preserves the food in its own remarkable way. Here’s a good starting method: take your ingredient and add 4% sea salt by weight. Massage it all together until thejuices really get flowing and then pack tightly into sterilized jars either fitted with a rubber-lined lid or clean muslin cloth, leaving a gap for expansion. As the fermentation gets lively (and it should do within a couple of days), gases will need to escape, so make sure to burp your jars if they are sealed. You won’t need to refrigerate the resultant product and it should last for ages if well cared for.
I love lacto-fermenting everything I possibly can – mushrooms, meat, greens, fruit – but it would be best to start with vegetables in the allium or brassica family, which tend to reliably respond well to the lacto-fermentation process. Try adding wild garlic to a batch of kimchi or nettles to a sauerkraut.
Infusion
The absolute beginner method. Take a bottle of clear spirit and pour over the top of something you’d like to preserve. That’s pretty much it. Save yourself from making a mess or slowing down the rate of infusion by only adding sugar after the aging process (you can add sugar but never take it away) and you’ll soon be overrun with historic harvests in the form of bottles of booze. My general rule of thumb is to infuse fruit for a year, foliage for a month and flowers for a day. That means that the sloe gin you make this autumn should be given as Christmas presents next year, as opposed to bottling what will essentially just be purple gin this year. And that whole pricking with a pin thing? Total waste of time – whack them in the freezer and then take them out once they’ve frozen. You’ll save yourself hours and the rate of infusion will be much higher. Win win.
Fruit liqueurs are the obvious ones to make, but my recipe this month may surprise you…


What to forage this month
Taken from the Forage Box Foraging Calendar 2026 – now available to order.
Shaggy Inkcap – incredible to look at and just as delicious
Hen Of The Woods – my favourite mushroom to find!
Black Trompette – camouflage so a bit tricky to spot, but an absolutely wonderful thing to discover in the woods
Sloe – plenty more to do with this bitter relative of the plums besides sloe gin
Sweet Chesnuts – kicking off just in time for the festive season
Guelder Rose – poisonous when raw, but tasting a little like cranberry when cooked
Mussels – shellfish season is back!
This month’s species in focus: Beefsteak Fungus
Habitat: mainly on old oak treesDescription: undeniably ‘beefy’ in appearance, particularly once sliced open when a real marbling can be seen! A fun demo I like to do on my workshops is to squeeze it until the red ‘blood’ runs out – this is actually a solid ID feature and unique to the beefsteak fungus.
Lookalikes: None, unless you’re being really careless
Picking guide: Slice near to the tree, but only on firm and juicy specimens. It can turn really mushy if left to its own devices, but these are best avoided.
Cooking tips: Best to not! Serve as sashimi with a dash of soy or a sweet chilli dipping sauce.
Recipe: Beefsteak Fungus and Sloe Gin
Yes, mushroom gin. Whilst I have made liqueurs from mushrooms like chanterelles, porcini, hen of the woods, artists conk and more, these tend to be quite earthy affairs. The beefsteak fungus is a fruitier fungus with comparisons to unripe plums, watermelon or even lemon all being noted by people I have fed it to (when raw, it’s great. Don’t be tempted to cook it unless you can handle the most slug-like texture you can imagine).
I do have a bottle or two of this in the drinks cabinet, but have made a few batches in recent times with the inclusion of some fruit, mainly to add depth. Damsons, plums, figs or other sticky fruit would all work well, but let’s keep it wild for this one. I’ve also kept it simple and included a few little tips that you can apply across the board when making any liqueur.
Ingredients:
500g Sloes
500g Fresh beefsteak fungus
1L Gin (cheap is fine)
Sugar/honey (optional in 12 months!)
Equipment:
Big jar, tub or similar wide-necked vessel
Method:
- Freeze your sloes. This unlocks whatever sweetness you can get out of them but also saves you hours of pricking them with a needle.
- Take your sloes out of the freezer and roughly chop up your beefsteak fungus. Put them all in your jar.
- Fill with gin, ensuring no air pockets exist. Don’t be tempted to add sugar here – this will affect your infusion rate, risk moulds/fermentation and it’s very hard removing the sugar from something once it’s been added.
- Label your jar and pop somewhere cool and dry for 12 months.
- Once 12 months have passed, strain off the liquid into a large bowl or tub
- Give it a taste – I like mine dry but you can add sugar or honey to taste here if you things a little sweeter.
- Bottle. If you can be really patient, you would ideally pop this in a dark corner of your drinks cabinet and forget about it for another year minimum.